Overclocking a graphics card is a great way to unlock higher framerates. In many cases, you are able to increase the performance of a GPU to that of the next better model. For example, AMD 6950 uses, basically, the same hardware as the 6970, just with a couple parts on the GPU core disabled and its at lower clocks. Well, if the hardware is the same then it should be able to hit the same clocks as the 6970, right? In many cases, this is true. For example, the AMD 5870 has a stock clock of 850 mhz, while Im able to get my 5850s to 870 mhz on stock voltage. Looking at the hard data, a 5870 has a 68 Gigatexels/second fill rate and a 153.6 GB/sec memory bandwidth. My 5850s are at 62.6 Gigatexels/sec and 153.6 GB/s (from GPUZ). At the same time, brand new, my cards were $150 cheaper. Pretty good argument for overclocking, no?
A word of warning: As much as overclocking is supported, it is not officially supported. This means that should you damage your card and send it in for a replacement, and the support tech staff is able to determine that you overclocked your card, then your warranty is void. OCing through software makes it very difficult for them to determine this, whereas a flashed BIOS makes it extremely easy.
Ok, so, regardless of why you want to overclock, lets get into the basics of it.
Core means the actual GPU core, where most of the magic happens. The speed, in mhz, that your GPU core is running at is going to greatly affect the texture and pixel fillrate performance, which is a huge bottleneck in gaming.
Memory (VRAM) is where textures are stored as well as rendered frames. There are plenty of performance benefits to having a higher memory speed, considering that pretty much everything you see on screen is at one time in the memory.
I ran some tests on FurMark, at 1920x1080, showing how both core speed and memory speed can affect performance. As you can see in the graph, the framerate went up as the memory speed increased, with barely any change from core speed. It is important to note that this particular test was run using 4xMSAA. I also did some tests at 0xMSAA in FurMark, and it showed that only core speed had an improvement. Basically I just want to point out that for optimal overclocking, you need to focus on both memory and core speeds.
Voltage is what gives you stability. As the core speed increases, it may need an increase in voltage to remain stable, much like in CPU overclocking. Most higher end GPUs allow voltage modification, however, not all GPUs allow this. In some cases you might be able to also modify the VRAM voltage, but this is fairly uncommon. If you can, then in much the same way as core voltage, it can help you achieve higher clocks.
VRM is the Voltage Regulator Module. This is what adjusts your input voltage to that going into your GPU. These are very prone to over heating when overclocking, especially if you increase your voltage.
The first things youll need is a program to adjust GPU clocks. AMD offers Overdrive in the Catalyst Control Center, and many manufacturers offer their own tweaking programs, like Sapphire Trixx, MSI Afterburner, and EVGA Precision. Personally, I use Afterburner - with my Sapphire cards. It is probably the best all around program, and the only reason not to use it is if you have non-reference, non-MSI cards and want to adjust the voltage.
You will also want to download something to monitor your cards. Afterburner takes care of this, but you should also consider getting GPU-Z because it monitors more than just the core temperature. In most cases, you will also be able to see your VRAM and VRM temperatures as well. Ideally your temps wont surpass 80-90C at the absolute most. For my 5850s, I found I would get a hard system crash or lockup when VRM or VRAM hit around 120C, although my core temperature was still in an acceptable area - so keep in mind that you should check on those temps too.
Before you start, make sure that you do NOT have "apply overclock at startup" selected!
The basics of GPU overclocking are very similar to CPU overclocking. Personally, I recommend starting with Memory clock because it gives nice gains and often isnt affected by voltage - since usually you can only change core voltage. To overclock the memory, I like to start with 50mhz jumps, with 5 minutes of FurMark testing at 4xMSAA at full screen - also, let the cards stay heated up a fair bit rather than giving them a long cool down time between tests. You may want to set up your tests using the benchmark feature. Continue this until you get either a lock up, crash, artifacts, or the screen goes blank. Doing a hard reset on your PC isnt fun, but it shouldnt wreck anything. I usually find that ctrl+alt+del still works and you can reset from there.
When running your 5 minute benchmark tests, you will get a score at the end. As you increase the memory speed, you should see an improvement to the score. However, at some point even if you dont get a crash or lockup, you might notice your score either didnt increase, or worse yet, decreased. This is a vital thing to notice. The reason for this, as I understand it, is that GDDR5 memory - that is, the most common memory used for GPUs - is meant to be crash resistant. It does this by being able to resend data that failed the first time due to being unstable. In this way, if you are nearing the point of crashing, leading up to it the VRAM will need to resend data repeatedly, and therefore it will reduce performance compared to every piece of data being sent only once. Therefore, if you notice this occuring, slowly reduce your clocks by 5mhz until you realize the highest score.
Moving on to GPU core overclocking, the process is much the same. You can still start with 50 mhz jumps, but with the testing you should run at 0xMSAA in FurMark. Also try to keep temperatures high throughout the testing phase.
The most common issue of an unstable core is artifacting. This is when pixels essentially get stuck, and youll notice multiple squares on screen that dont sync up with the image. At this point you will want to stop the test and will also have to reboot the PC. You have a choice here, either to reduce the clock or else increase the voltage. For 24/7 overclocks, I highly recommend reducing the clock and finding the highest stable clock on stock voltage. However, if you want to increase the voltage, I suggest doing it in 0.05V increments. Basically just increase the voltage and retest at the same clocks, and repeat until stable. It is also vitally important to watch all your temperatures, because as I mentioned before, its possible that you crash because of heat and not instability.
Extra Info
There are, as always, a few other things to consider. FurMark isnt perfect in determining if your GPU is stable. Ive passed fairly long sessions in FurMark, as well as a few games, before finally having an issue in one specific game. It didnt take long to realize that my GPU OC was to blame, and dropping my memory clock by only 5mhz made it nice and stable from there on out. So, actually playing games will be your final stress test.
If you run crossfire or SLI, there might be issues with instability. Generally it should be ok, but Ive read about issues with crossfire that has to do with the switch between low power and high power, and only occurs when a custom voltage is set. It seems the way around this is to disable ULPS, which you can google for yourself.
Another area of problem is that sometimes after an overclock is applied, the graphics cards wont automatically change to low power state at idle, or else the idle state clocks are higher than they used to be. This is something that is at the mercy of people making the overclock programs, and the only way around this (and other) issues is to manually reflash your GPU BIOS. This is not a recommended practice, but I will just put here that if you have a very stable overclock, it is a handy thing to do because your GPU will essentially think that the overclock settings are its default settings, so it behaves like a totally stock card. There are tools for changing and flashing the BIOS, and for more info check out techpowerup.com.
If you have concerns about your particular brand or model of graphics card, just google your card and key terms like "overclocking" "highest clocks" "stability" to find a variety of sources. I always advise learning as much as you can before doing something you dont quite understand, and causing damage.
Read More..
A word of warning: As much as overclocking is supported, it is not officially supported. This means that should you damage your card and send it in for a replacement, and the support tech staff is able to determine that you overclocked your card, then your warranty is void. OCing through software makes it very difficult for them to determine this, whereas a flashed BIOS makes it extremely easy.
Ok, so, regardless of why you want to overclock, lets get into the basics of it.
Key Terms
Core means the actual GPU core, where most of the magic happens. The speed, in mhz, that your GPU core is running at is going to greatly affect the texture and pixel fillrate performance, which is a huge bottleneck in gaming.
 |
| Im not paid for complete testing ;) |
I ran some tests on FurMark, at 1920x1080, showing how both core speed and memory speed can affect performance. As you can see in the graph, the framerate went up as the memory speed increased, with barely any change from core speed. It is important to note that this particular test was run using 4xMSAA. I also did some tests at 0xMSAA in FurMark, and it showed that only core speed had an improvement. Basically I just want to point out that for optimal overclocking, you need to focus on both memory and core speeds.
Voltage is what gives you stability. As the core speed increases, it may need an increase in voltage to remain stable, much like in CPU overclocking. Most higher end GPUs allow voltage modification, however, not all GPUs allow this. In some cases you might be able to also modify the VRAM voltage, but this is fairly uncommon. If you can, then in much the same way as core voltage, it can help you achieve higher clocks.
VRM is the Voltage Regulator Module. This is what adjusts your input voltage to that going into your GPU. These are very prone to over heating when overclocking, especially if you increase your voltage.
How To Overclock
 |
| MSI Afterburner |
 |
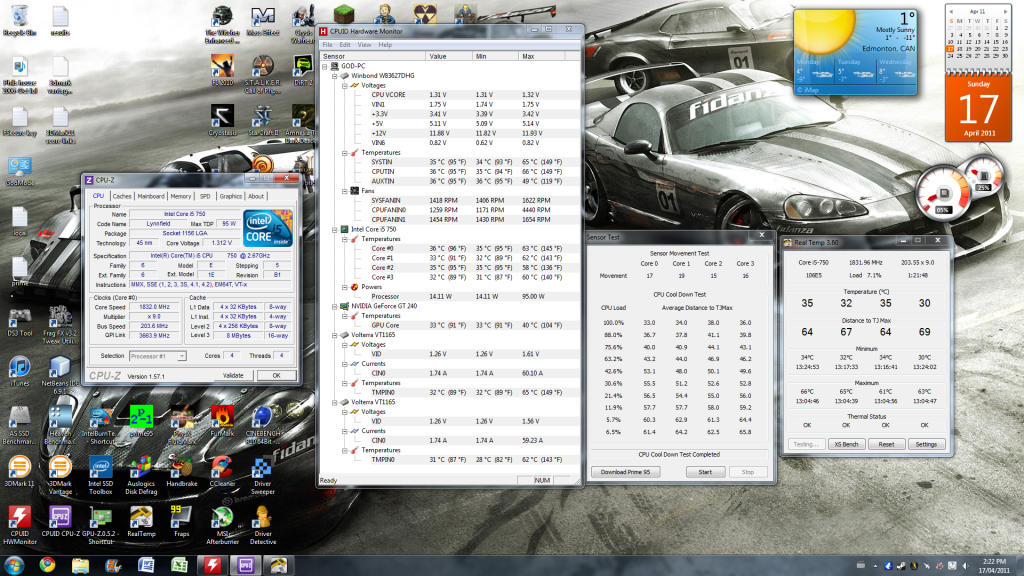
| GPU-Z Sensors |
Before you start, make sure that you do NOT have "apply overclock at startup" selected!
The basics of GPU overclocking are very similar to CPU overclocking. Personally, I recommend starting with Memory clock because it gives nice gains and often isnt affected by voltage - since usually you can only change core voltage. To overclock the memory, I like to start with 50mhz jumps, with 5 minutes of FurMark testing at 4xMSAA at full screen - also, let the cards stay heated up a fair bit rather than giving them a long cool down time between tests. You may want to set up your tests using the benchmark feature. Continue this until you get either a lock up, crash, artifacts, or the screen goes blank. Doing a hard reset on your PC isnt fun, but it shouldnt wreck anything. I usually find that ctrl+alt+del still works and you can reset from there.
 |
| FurMark stress test |
Moving on to GPU core overclocking, the process is much the same. You can still start with 50 mhz jumps, but with the testing you should run at 0xMSAA in FurMark. Also try to keep temperatures high throughout the testing phase.
The most common issue of an unstable core is artifacting. This is when pixels essentially get stuck, and youll notice multiple squares on screen that dont sync up with the image. At this point you will want to stop the test and will also have to reboot the PC. You have a choice here, either to reduce the clock or else increase the voltage. For 24/7 overclocks, I highly recommend reducing the clock and finding the highest stable clock on stock voltage. However, if you want to increase the voltage, I suggest doing it in 0.05V increments. Basically just increase the voltage and retest at the same clocks, and repeat until stable. It is also vitally important to watch all your temperatures, because as I mentioned before, its possible that you crash because of heat and not instability.
Extra Info
There are, as always, a few other things to consider. FurMark isnt perfect in determining if your GPU is stable. Ive passed fairly long sessions in FurMark, as well as a few games, before finally having an issue in one specific game. It didnt take long to realize that my GPU OC was to blame, and dropping my memory clock by only 5mhz made it nice and stable from there on out. So, actually playing games will be your final stress test.
If you run crossfire or SLI, there might be issues with instability. Generally it should be ok, but Ive read about issues with crossfire that has to do with the switch between low power and high power, and only occurs when a custom voltage is set. It seems the way around this is to disable ULPS, which you can google for yourself.
Another area of problem is that sometimes after an overclock is applied, the graphics cards wont automatically change to low power state at idle, or else the idle state clocks are higher than they used to be. This is something that is at the mercy of people making the overclock programs, and the only way around this (and other) issues is to manually reflash your GPU BIOS. This is not a recommended practice, but I will just put here that if you have a very stable overclock, it is a handy thing to do because your GPU will essentially think that the overclock settings are its default settings, so it behaves like a totally stock card. There are tools for changing and flashing the BIOS, and for more info check out techpowerup.com.
If you have concerns about your particular brand or model of graphics card, just google your card and key terms like "overclocking" "highest clocks" "stability" to find a variety of sources. I always advise learning as much as you can before doing something you dont quite understand, and causing damage.